Bird Photography
Birder's Guide to Bird Photography
Note to the readers: The birdersHut is supported by its audience. When you purchase a product or service through links on this site, we may earn an affiliate commission. Please read our Privacy Policy for further information.
Birdwatching and Bird Photography usually go hand in hand. If you are an ardent birder who want to capture definitive photograph of a bird species you see as a record or to assist you with the identification later on, you must consider involving in Bird Photography. If you decided to pursue with photographing birds along with your birding activities, you should have a basic knowledge about the equipment required as well as some techniques of photographing birds. This guide is not intended for the professional bird photographers who produce aesthetically pleasing bird images for publishing. This is for the birdwatchers who step into the bushes trying to see and record as many bird species as they can.
Buy the Right Equipment
To start photographing birds, all you need is an interchangeable lens camera and a suitable lens. If you already have a DSLR (Digital Single-Lens Reflex) camera body with you, consider investing in a telephoto lens preferably with the same brand and mount (each camera system has its own lens mount, so there’s no cross-compatibility unless you use an adaptor). If you don’t have a camera body yet, then look into purchasing an entry or intermediate level DSLR or Mirrorless camera body. DSLR cameras have a reflex mirror inside them, which bounces light up into the optical viewfinder and on the other hand in mirrorless cameras light goes directly into the image sensor. Viewfinders on mirrorless cameras are electronic and show the same preview of the image that you’d see on the LCD screen. If you are planning to buy a brand-new body, expect to pay from $750 to $3,000 for a body. There are some good quality second-hand cameras available in the market for a half of the price mentioned above.
Undoubtedly the most important piece of equipment for bird photography is the telephoto lens. The best lenses for bird photography are lenses with focal lengths of 300mm, 400mm, 500mm, 600mm, or even 800mm. If you’re just starting up bird photography, you might want to consider a zoom telephoto lens which is less costly compared to prime fixed focal lenses. With the modern advancement of the technology, there are some very good zoom telephoto lens in the market today. However, expect to pay over $1500 for a brand-new all round telephoto zoom lens such as 150-600mm f/5-6.3 range. Again, looking at the second-hand market is a good choice for the birders with limited budget.
Apart from the camera and the lens, you need a study tripod and a bag to carry your camera and the lens. The tripod can be used to mount your spotting scope when required.
However, if you only want to use your digital camera with its kit lens (often 35mm to 75mm), you can still get better bird images by getting closer to the bird, concentrating on larger birds, taking photos in places where birds are used to human presence such as parks, zoos and backyards, setting up a bird feeder in your backyard and using your house as a blind or use your car as a blind and shooting through the window.
Important Camera Features
Exposure Mode: Use Aperture Priority mode (A) to achieve the best exposures. It is recommended that setting of your aperture between f/5.6 and f/8 to get the full body of the bird sharp in the image.
ISO: Set your camera to Auto ISO for reduced noise images.
Metering Mode: Use the Evaluative/Matrix metering mode for accurate exposures.
Exposure Compensation: Learn to use Exposure compensation button which lets you adjust your exposure based on the lighting condition.
Focusing: Adjust the focusing mode into continuous focusing (AF-C, AI Servo) mode. Setting this AF focusing mode will ensure that the camera automatically keeps tracking and focussing on the moving bird for as long as it’s within the AF frame.
Shooting Mode: Set your camera to continuous shooting mode (Burst mode) where several photos are captured in quick succession by either pressing the shutter button or holding it down.
Techniques and Practises for better quality images
Avoid using lens filters as filters degrade image quality to some degree and remember to keep the lens hood at all times. It reduces flare and protect the lens from scratches.
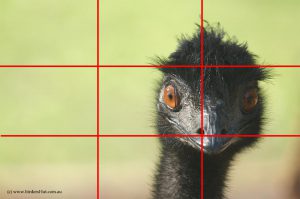
The best compositional tip is the “Rule of Thirds” (ROT). The ROT is very common technique that is use in photography. The ROT implies that the bird should be placed on one of the 4 intersection points to make an image more appealing. If the bird fills the frame or is the only subject of interest in the photograph, then place the bird’s eye or head-on or close to one of the 4 intersection points.

Rule of Thirds
Try to keep the background clutter free and pure as much as possible. Avoid man-made objects in your image. Try to put the whole bird in the frame if possible. Watch for the angle of the sun light.
